Extracellular Vesicles (EVs): Isolation by ME™ Kit
Our EV isolation procedure is based on the specific binding of a peptide (Vn96 peptide, US Patent # 8,956,878; also see Ghosh, et al., PLoS One. 2014 Oct 17;9(10):e110443) to Heat Shock Proteins (HSPs) on the surface of EVs. This binding leads to the EVs being easily precipitated into a pellet with a brief series of centrifugations in a normal benchtop microcentrifuge. After collection, the EVs can be used in multiple downstream assays, such as Western blotting, staining, PCR, RT-PCR, Mass Spectrometry profiling, nanoparticle tracking, and electron microscopy.
Note: Carefully read the entire protocol before starting your planned experiments to ensure you have all of the required supplementary materials.
These protocols are guides. To obtain the best results, you may need to titrate a suitable volume of your starting material and/or the amount of Vn96 peptide used.
Storage: 4°C (39°F)
Reagent Prep: Make Vn96 stock by adding 400µL ME-buffer to a Vn96 peptide tube (40µL ME-buffer should be added to Vn96-Scr tube if using negative control) and mixing thoroughly by pipetting up-down or tapping. Material may appear hazy or turbid, but do not centrifuge.
Note: If using pre-made peptide stock in your assay, be sure to mix material again thoroughly before adding to sample.
Table of Contents:
Item Page
Supporting information
Section 1: EV Precipitation with ME™ Kit
Section 2: Preparation of EV-Vn96 pellet for downstream protein analyses
2.1: Western Blot
2.2: Proteomic Analysis
Section 3: Preparation of EV-Vn96 pellet for downstream nucleic acid analyses
3.1: RNA Extraction
3.2: DNA Extraction
Section 4: Preparation of EV-Vn96 pellet for structural or functional studies
4.1: Structural studies (EM or AFM)
4.2: Functional studies (Separation of EVs from EV-Vn96 complex)
Section 5: Fluorescent labeling of EVs
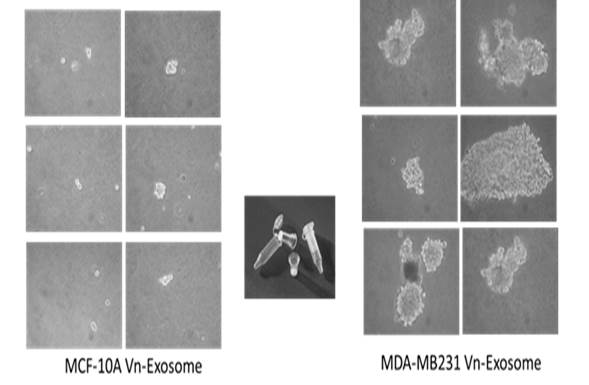
Section 6: Cellular transformation assay (anchorage independent soft-agar assay)
Recommended Supplementary Materials:
Material Recommended product* Section
PBS (0.1µm filtered) - All
0.1µm syringe filter Pall Corporation, Cat # 4651 All
Nonidet P40 or equivalent (e.g. Igepal CA-630) Sigma, Cat # I8896 Section 1
DNase Turbo DNase, Life Technologies Section 1
RNase RNase A, Life Technologies Section 1
0.5M EDTA pH 8.0 - Section 1
Protease inhibitor PICIII, EMD Cat # 539134 Section 1
Biocide (clinical samples) ProClin 300, Sigma Cat # 48912-U Section 1
0.2µm syringe filter Pall Corporation, Cat # 4652 Sections 1 & 5
4x SDS-PAGE loading buffer - Section 2
SDS-PK Lysis buffer - Section 3
RNA Isolation kit Exiqon, miRCURY Section 3
Phenol : Chlorophorm : isoamyl alcohol (PCI) (24:25:1) Sigma Section 3
PCR Clean up kit Qiagen Section 3
Column-based DNA Extraction kit - Section 3
Proteinase K (20mg/ml) Ambion, Cat # AM2548 Sections 3 & 4
2N NaCl solution (300kDa filtered) - Section 4
300kDa Cut-off filter Pall Corporation, Cat # 0D300C33 Sections 4 - 6
PKH26 or PKH76 Fluorescent Cell Linker Kit Sigma Section 5
8-well chamber-slide Thermo, Cat # 177402 Section 5
0.45µm Syringe filter Millipore, Cat # SLLHR04NL Sections 5 & 6
FBS/EV-Free media Théry, et al. (2006) Protocol Sections 5 & 6
2mM EDTA/PBS - Section 6
Ethanol 70% - Section 6
Agarose Invitrogen, Cat # 16520-050 Section 6
DMEM/F-12 Life Tech., Cat # 12500-062 Section 6
* These recommendations are based on our results.
Sample Volume by Analysed Fluid:
Analysed Fluid Recommended Volume per Sample Number of isolations per kit* Recommended Catalog #
Cell culture conditioned media 5 - 10mL 20 isolations ME-020-kit
Bioreactor-generated conditioned media 1mL 20 isolations ME-020-kit
Urine 3 - 4mL 20 isolations ME-020-kit
Plasma/Serum 1mL 20 isolations ME-020p-kit
Other biological fluids User optimized User optimized Please call
*User may need to titrate the suitable volume of starting material and the concentration of the Vn96 peptide.
Test Number Per Isolation by Downstream Analyses:
Downstream Analysis Number of tests per isolated sample*
Western Blot 2 – 4 tests1
Proteomic Analysis 2 – 4 tests
Nucleic acid sequencing 1 test
Nanoparticle Tracking Analysis 5 – 10 tests
Electron Microscopy or Atomic Force Microscopy 5 – 10 tests
Exosome release/uptake experiments 2 – 4 tests2
*Test number based on our results and recommendations. User may optimize the number of tests per isolation for their downstream analyses.
1 Based on the affinity of the antibody used
2 Based on use of an 8-well Chamber Slide
Section 1: EV Precipitation with ME™ Kit (Media/Urine)
Samples: This protocol may be used with diluted fluids like cell-culture conditioned media, bioreactor-generated conditioned media, or urine. Please refer to the table on page 2 for recommended volumes. User may supplement biological samples with protease inhibitors and biocide. NP-40 (0.25% final concentration) may also be added to help reduce non-specific interactions, but do not use NP-40 if isolating samples for Mass Spectrometry analysis.
1. Pre-clear: Filter the sample through a 0.2µm syringe filter or spin at 17,000g for 15 minutes and collect the supernatant.
Note 1 (optional): User may add DNase (0.5-2 units) and/or RNase (0.5-2µg) to the sample if desired.
Note 2: Distribute the sample to multiple microcentrifuge tubes if you have a volume larger than 1.5-2.0 mL and/or you wish to use only benchtop microcentrifuges.
2. Add a total of 20µL of Vn96 stock to the total pre-cleared volume of sample (divide evenly between tubes) and mix immediately by repeated inversion.
3. Incubate at room temperature with end-over-end rotation for 15 minutes to one hour.
Note: You may alternatively incubate sample overnight at 4°C.
4. Centrifuge the tubes at 15,000g for 10 minutes at room temperature (or at 4°C if the incubation with Vn96 was performed overnight). A semi-translucent pellet will be visible at the bottom of the tube following centrifugation (the EV-Vn96 complex). Very carefully remove the supernatant from each tube using a pipette and discard.
Note 1: Many variations in speed and time of centrifugation (10,000-17,000g for 7-15 minutes) have also worked.
Note 2: The semi-translucent pellet may not adhere to the tube after centrifugation is done, so take care not to remove the pellet with the supernatant.
5. A. Collect and pool the EV-Vn96 pellet to one tube if you are using multiple tubes for one sample: To one tube add a half-tube volume of PBS (this should be supplemented with 1.0µL/mL 0.5M EDTA to inactivate RNase and DNase if this was added above). For example, use 1mL of PBS if you are using 2mL tubes or 0.5 mL if you are using 1.5 mL tubes. Very gently pipet the PBS onto the semi-translucent EV-Vn96 pellet to dislodge it from the tube, then carefully transfer all the content to the next tube. Repeat the process using the same approach until all the pellets from the same sample have been pooled into one tube. Do not throw away empty tubes.
B. Repeat the above serial collection steps for each empty tube from step 5A with an additional half-volume of PBS to collect any residual EV-Vn96 pellet material that may remain.
6. Centrifuge the sample at 15,000g for 10 minutes at room temperature. Carefully remove and discard the supernatant.
7. Wash the EV-Vn96 pellet an additional two times with 1-2mL of PBS depending on tube size used above.
Note: If performing subsequent proteomic studies, we recommend changing the tube at least once while washing for the best results.
8. Carefully remove and discard the supernatant from the EV-Vn96 pellet. At this point, the pellet may be stored at -80°C, or you may continue immediately to the instructions in the following sections for subsequent analyses.
Section 2: Preparation of EV-Vn96 pellet for downstream protein analyses
Section 2.1: Western Blot
Re-suspend the pellet in the desired amount of 4x SDS-PAGE loading buffer (30-50µL). Load 15-30µL of pellet sample into each lane. The loading buffer can be supplemented with reducing agent if appropriate for the antibody being used. For example, if you are using anti-CD63 antibody, use of a non-reducing loading buffer is advised.
Section 2.2: Proteomic Analysis
For nanospray liquid chromatography mass spectrometry (LC / MS) analysis, separate the sample by SDS-PAGE (make sure to run the Vn96 peptide species off the bottom of the gel), then fix, stain (EZBlue), and destain the gel to prepare for protein excision. Excise the proteins from each lane by partitioning into 12 equal samples. Proceed to in-gel digestion and off line C18 clean-up of the samples before analyzing by LC / MS.
Recommended in-gel digestion protocol:
1. Dehydrate bands until using 1mL of acetonitrile and vortexing for five minutes.
2. Rehydrate bands with 50-100µL of 10mM DTT in 100mM ammonium bicarbonate and incubate at 56°C for one hour in order to reduce all disulfide bonds.
3. Remove excess DTT and dehydrate bands as outlined in step 1.
4. Rehydrate bands with 50-100µL of 25mM iodoacetic acid in 100mM ammonium bicarbonate and incubate at room temperature in the dark for one hour to alkyalate cysteine residues.
5. Remove excess iodoacetic acid and dehydrate bands as outlined in step 1.
6. Rehydrate bands with mass spectrometry grade trypsin (reconstituted using manufacturer’s instructions) at a ratio of 1µg trypsin : 40µg protein (some titration of trypsin amounts may be required to optimize this ratio based on sample type). Let bands swell initially with trypsin solution and cover with 100mM ammonium bicarbonate if needed. Incubate at 37°C for 12-18 hours.
7. Collect excess solution from bands and place in fresh labeled tubes. Add 50µL of 5% acetic acid and 50% acetonitrile to extract tryptic peptides and vortex for 30 minutes at room temperature.
8. Collect supernatant and add to fraction previously collected in step 7.
9. Repeat step 7.
10. Collect supernatant and add to previously collected fractions from steps 7 and 9.
11. Evaporate the combined fractions in speed vac/centrifuge until 5-10µL remains, then re-suspend to 50µL in 1% aqueous acetic acid.
12. Proceed to off-line C18 clean up using spin columns (Pierce, Cat #89870) using the manufacturer’s protocol. Re-suspend the final eluent in 0.1% aqueous formic acid.
Protein tryptic digests are analyzed by gradient nanoLC-MS/MS using a Quadrupole Orbitrap (Q-Exactive, Thermo-Fisher Scientific) mass spectrometer interfaced to a Proxeon Easy Nano-LC. Samples are adjusted to 0.1% aqueous formic acid and injected (2μL) onto a narrow bore (20mm long x 100μm inner diameter) C18 pre-column packed with 5μm ReproSil-Pur resin (Thermo-Fisher Scientific). High resolution chromatographic separation is then achieved on a Thermo-Scientific Easy C18 analytical column with dimensions of 100mm x 75 μm, i.d. using 3μm diameter ReproSil-Pur particles. Peptide elution is achieved using an acetonitrile/water gradient system, with LC-MS grade water and acetonitrile (VWR). Solvent A consists of 0.1% formic acid (Sigma-Aldrich) in water and solvent B is made up of 90/9.9/0.1 acetonitrile/water/formic acid. A linear acetonitrile gradient is applied to the C18 column from 5-30% solvent B in 60 minutes followed by 100% B for 10 minutes at a flow rate of 300nL/minute. The outlet diameter of the nano-flow emitter on the Q-Exactive (15μm) is biased to +1.9 kV and positioned approximately 2mm from the transfer capillary (heated to 250°C). The S-lens of the mass spectrometer is maintained at 100 V. The Q Exactive mass spectrometer is calibrated in positive ion mode with mass standards (caffeine, MRFA peptide and Ultramark). Mass spectrometric data is acquired in data dependent acquisition (DDA) mode, whereby a full mass scan from 350-1200 Th at 70,000 resolution is followed by the acquisition of fragmentation spectra for the five most abundant precursor ion intensities above a threshold of 20,000. Precursor ion spectra are collected at a resolution setting of 35,000 and an automatic gain control (AGC) value of 1x10⁶. Peptide fragmentation is performed using high energy collision induced dissociation in the HCD cell and MS/MS spectra are collected in the Orbitrap at a resolution of 17,500 and an AGC setting of 1x10⁵. Peptide precursors are selected using a repeat count of two and a dynamic exclusion period of 20 seconds.
Section 3: Preparation of EV-Vn96 pellet for downstream nucleic acid analysis
1. Add 100µL of lysis buffer (PBS supplemented to 0.5% SDS, 50µg Proteinase K/mL).
Note: Prepare fresh lysis buffer (for 1.5mL of lysis buffer, add 37.5µL of 20% SDS and 5µL of 20mg/mL proteinase K to 1460µL of PBS).
2. Vortex the tube or tap-mix to distribute the pellet into solution.
3. Incubate at 55°C with vigorous shaking (or tap-mixing) every minute for 15 minutes.
4. Bring the tubes to room temperature and continue to RNA isolation or DNA isolation procedure.
Section 3.1: RNA Extraction
1. Add 500µL of miRCURY* lysis buffer to the sample. Mix gently by inverting the tube.
2. Incubate at room temperature for 10 minutes.
3. Centrifuge the tube at 17,000g for two minutes at room temperature.
4. Collect the supernatant by removing it from the white pellet (SDS) and proceed to RNA extraction according the manufacturer’s instructions. If a very small fraction of the white pellet gets collected with the supernatant, it will not affect the column-based RNA or DNA isolation.
Note 1: *We prefer guanidine-based Exiqon-plant/cell RNA isolation Kit for RNA isolation.
Note 2: It is advised to centrifuge the column at 1,000g for one minute at the RNA-binding stage to maximize the binding of RNA to the column.
Section 3.2: DNA Extraction
1. Add 100µL of phenol : chloroform : isoamyl alcohol to each 100µL of lysate solution and mix well.
2. Spin at 10,000g for five minutes to separate layers.
3. Transfer top aqueous layer into a fresh tube and discard bottom layer.
4. Extract DNA using Qiagen PCR clean up kit according to the manufacturer’s protocol and finally elute to 30-50µL.
Note: Any column-based DNA extraction kit can be used.
5. DNA is ready for analysis, running on 2% agarose gel, or use for PCR or Next-Gen Sequencing.
Section 4: Preparation of EV-Vn96 pellet for structural or functional studies
Section 4.1: For structural studies (EM or AFM)
1. Add 50µL of PBS (300kDa filtered) to the EV-Vn96 pellet and, tap to mix and break up the pellet. Add 1µL of Proteinase K and tap to mix again, followed by incubation at 37°C for four hours to overnight.
2. Centrifuge the tube at 17,000g for 10 minutes and collect the supernatant to a new tube.
3. The collected supernatant contains the empty vesicles for structural studies by EM or AFM.
Note: User may store empty vesicles at 4°C for up to one week.
Section 4.2: Separation of EVs from EV-Vn96 complex for functional studies
1. Add 400µL of 2N NaCl (300kDa cut-off filtered) to the EV-Vn96 pellet, mix by tapping or by pipetting up and down (most of the pellet will go in solution) and incubate overnight at 4°C.
2. Centrifuge the tube at 10,000g for two minutes at room temperature and collect the supernatant to a new tube. This step removes any undissolved pellet, which may block spin filters in the subsequent steps.
3. Add the supernatant to a 300kDa cut-off filter, and centrifuge as recommended by the filter manufacturer.
Note 1: A speed and time of 7,000g for three minutes should be adequate.
Note 2: Flat membrane spin-filters are preferable. It is advised to wash the 300kDa cut-off filter with 0.1µm filtered PBS twice prior to use to remove any membrane fibres.
4. Spin-wash the functional EVs 3× with 200-400µL 2N NaCl (300kDa cut-off filtered) at the recommended speed and time of the filter manufacturer.
5. Add 200-400µL of PBS (300kDa cut-off filtered) and carefully mix the content by pipetting up and down without touching the pipette tip to the 300kDa membrane, then centrifuge at the recommended speed and time.
6. Repeat the PBS wash (Step 5).
Note: Proceed to Section 5 from here if you are doing fluorescent labeling, or Section 6 if running an anchorage independent soft-agar assay.
7. Collect the functional EVs by adding 50µL of PBS (300kDa cut-off filtered), mix by pipetting up and down, and place in a fresh tube.
Intact EVs are ready for nanoparticle tracking analysis, electron microscopy (regular or immunogold labeling), or atomic-force microscopy (AFM).
Note: EVs can be stored up to one year at –80°C in 50μL aliquots. Avoid repeated freeze / thaws. EVs can be stored short term (up to one week) at 4°C.
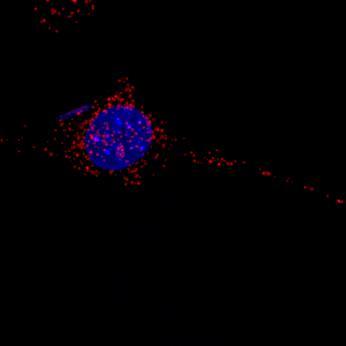
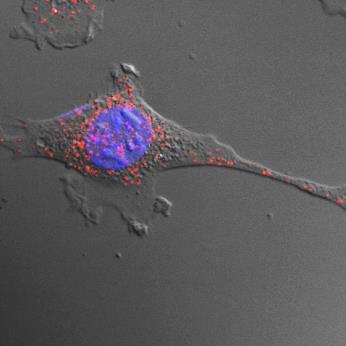
Section 5: Fluorescent labeling of EVs
Continue from Step 6 of Section 4.2: EVs still on 300kDa cut-off filter.
1. Wash the retained EVs 2-3 times with 100µL of Diluent C from the membrane labeling kit, PKH-26 red or PKH-76 green (Sigma) and centrifuge at 7,000g for 3-5 minutes at room temperature, or according to the manufacturer’s recommendations.
2. Prepare the label (PKH-26 or PKH-76) by diluting 2-4µL of label into 1mL of Diluent C and mix. Add 100µL of diluted label to each sample and immediately centrifuge at 7,000g for 3-5 minutes at room temperature, or according to the manufacturer’s recommendations.
3. Wash 2× with 100µL Diluent C to remove the excess stain, performing the centrifugation as described in Step 2.
4. Wash 3× with PBS supplemented with 1% BSA (0.1µm and 300kDa cut-off double-filtered).
Note: For this and subsequent steps, “0.1µm and 300kDa cut-off double-filtered” means first filtering the same material through a 0.1µm filter and then through a 300kDa cut-off filter.
5. Wash 2× with FBS-free or EV-free media (0.1µm and 300kDa cut-off double-filtered).
6. Add 300µL of EV-free media (0.1µm and 300kDa cut-off double-filtered) to EVs on the cut-off filter and centrifuge at 7,000g for 3-5 minutes at room temperature, or according to the manufacturer’s recommendations. Collect the retained labeled EVs in a new tube with 50-300µL FBS-free media or EV-free media (optimal volume will depend on your assay and/or EV concentration). It may be beneficial to repeat this last collection step with the same volume of media to collect additional EVs.
7. To the collected labeled EV sample (Step 6), add the desired volume of EV-free media for Step 8 and filter-sterilize (with 0.2µm or 0.45µm syringe filters) for subsequent use in cellular assays.
8. Add 100-300µL of labeled EVs into each well of the host cells (grown overnight in EV-free media, either on 8-chamber slides or on coverslips containing 300µL FBS-free media).
9. Incubate the labeled EVs with cells for 10-30 minutes or overnight at 37°C, depending on experimental timeline. Remove the excess EVs not taken up by the cells by washing the cells 2× with EV-free FBS culture media.
Continue by following a standard immunofluorescence microscopy protocol.
Section 6: EV-mediated cellular transformation assay (anchorage independent soft-agar assay)
Continue from Step 6 of Section 4.2: EVs still on 300kDa cut-off filter.
1. Grow NIH/3T3 cells (ATCC® CRL-1658™) in EV-free FBS culture media. Lift cells from flask/dish using non-enzymatic solutions (e.g., sterile 2mM EDTA in PBS).
2. Wash 3× with PBS and 1× with serum-free media.
3. Count cells and distribute 5,000-10,000 cells in 100µL of FBS-free media to each microfuge tubes. The cells will be needed for Step 7.
4. Spin-wash the EVs (on-filter) with 100-300µL FBS-free media.
5. Add 300µL of FBS-free media on the filter and collect the EVs by pipetting up and down.
6. Filter-sterilize the collected EVs with a 4mm 0.45µm filter.
Note: The filters should be pre-sterilized in a cell culture-hood using 70% ethanol followed by air drying for 30 minutes.
7. Mix 100-300µL of the collected EVs to the cells in 1.5mL microfuge tubes and incubate the mixture at 37°C for 30 minutes to a few hours. Meanwhile, prepare the soft-agar.
8. Preparation of soft agar:
(a) Autoclave 1.2% low melting agarose in water and kept at room temperature until needed. Just before use, liquefy agarose in microwave for 15-40 seconds and keep in a 40°C water bath.
(b) Make 2× concentrated DMEM/F-12 from powder, supplemented with buffered HEPES and appropriate antibiotics. Sterilize through 0.2µm filter and store long term at 4°C.
(c) Pre-heat DMEM/F-12 media for one hour in a 37°C water bath before use. You will need to make enough 0.6% agarose - DMEM/F-12 media for plating.
9. Soft-agar plating:
(a) Mix 1 part 1.2% agarose + 1 part 2x DMEM/F-12 media (0.6% agarose - DMEM/F-12) and quickly add 1-1.2mL into each well of a 12-well plate. Keep plate at room temperature for one hour to solidify, but leave remainder of the media in the 37°C water bath.
(b) Remove cells + EV mixture (Step 7) from the 37°C incubator, mix with equal volume of 0.6% agarose in media and immediately add onto the solidified 0.6% layer on the plate.
(c) Keep the plate in a room temperature incubator for one hour or until the new 0.3% layer (with cells + EVs) is semi-solid. Slowly add 1mL of EV-free complete media on top of the 0.3% layer.
10. Change the top-media very carefully every 3-4 days for 3-4 weeks until anchorage-independent colonies appear for photographs and counting.